
(R Tutorials for Business Analyst)
R Matrix Tutorial: Create, Print, add Column, Slice
What is a Matrix?
A matrix is a 2-dimensional array that has m number of rows and n number of columns. In other words, matrix is a combination of two or more vectors with the same data type.
Note: It is possible to create more than two dimensions arrays with R.

How to Create a Matrix in R
We can create a matrix with the function matrix(). This function takes three arguments:
matrix(data, nrow, ncol, byrow = FALSE)
Arguments:
- data: The collection of elements that R will arrange into the rows and columns of the matrix
- nrow: Number of rows
- ncol: Number of columns
- byrow: The rows are filled from the left to the right. We use `byrow = FALSE` (default values), if we want the matrix to be filled by the columns i.e. the values are filled top to bottom.
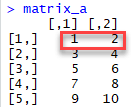
Let’s construct two 5×2 matrix with a sequence of number from 1 to 10, one with byrow = TRUE and one with byrow = FALSE to see the difference.
matrix_a <-matrix(1:10, byrow = TRUE, nrow = 5)
matrix_a
Output:
Print dimension of the matrix with dim()
# Print dimension of the matrix with dim()
dim(matrix_a)
Output:
## [1] 5 2
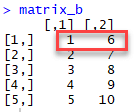
Construct a matrix with 5 rows that contain the numbers 1 up to 10 and byrow = FALSE
# Construct a matrix with 5 rows that contain the numbers 1 up to 10 and byrow =  FALSE
matrix_b <-matrix(1:10, byrow = FALSE, nrow = 5)
matrix_b
Output:
Print dimension of the matrix with dim()
# Print dimension of the matrix with dim()
dim(matrix_b)
Output:
## [1] 5 2
Note: Using command matrix_b <-matrix(1:10, byrow = FALSE, ncol = 2) will have same effect as above.
You can also create a 4×3 matrix using ncol. R will create 3 columns and fill the row from top to bottom. Check an example
matrix_c <-matrix(1:12, byrow = FALSE, ncol = 3)
matrix_c
Output:
##       [,1] [,2] [,3]
## [1,]    1    5    9
## [2,]    2    6   10
## [3,]    3    7   11
## [4,]    4    8   12
Example:
dim(matrix_c)
Output:
## [1] 4 3
Add a Column to a Matrix with the cbind()
You can add a column to a matrix with the cbind() command. cbind() means column binding. cbind()can concatenate as many matrix or columns as specified. For example, our previous example created a 5×2 matrix. We concatenate a third column and verify the dimension is 5×3
Example:
# concatenate c(1:5) to the matrix_a
matrix_a1 <- cbind(matrix_a, c(1:5))
# Check the dimension
dim(matrix_a1)
Output:
## [1] 5 3
Example:
matrix_a1
Output
##       [,1] [,2] [,3]
## [1,]    1    2    1
## [2,]    3    4    2
## [3,]    5    6    3
## [4,]    7    8    4
## [5,]    9   10    5
Example:
We can also add more than one column. Let’s see the next sequence of number to the matrix_a2 matrix. The dimension of the new matrix will be 4×6 with number from 1 to 24.
matrix_a2 <-matrix(13:24, byrow = FALSE, ncol = 3)
Output:
##      [,1] [,2] [,3]
## [1,]   13   17   21
## [2,]   14   18   22
## [3,]   15   19   23
## [4,]   16   20   24
Example:
matrix_c <-matrix(1:12, byrow = FALSE, ncol = 3)
matrix_d <- cbind(matrix_a2, matrix_c)
dim(matrix_d)
Output:
## [1] 4 6
NOTE: The number of rows of matrices should be equal for cbind work
cbind()concatenate columns, rbind() appends rows. Let’s add one row to our matrix_c matrix and verify the dimension is 5×3
matrix_c <-matrix(1:12, byrow = FALSE, ncol = 3)
# Create a vector of 3 columns
add_row <- c(1:3)
# Append to the matrix
matrix_c <- rbind(matrix_c, add_row)
# Check the dimension
dim(matrix_c)
Output:
## [1] 5 3
Slice a Matrix
We can select elements one or many elements from a matrix by using the square brackets [ ]. This is where slicing comes into the picture.
For example:
- matrix_c[1,2] selects the element at the first row and second column.
- matrix_c[1:3,2:3] results in a matrix with the data on the rows 1, 2, 3 and columns 2, 3,
- matrix_c[,1] selects all elements of the first column.
- matrix_c[1,] selects all elements of the first row.
Here is the output you get for the above codes

Disclaimer: The information and code presented within this recipe/tutorial is only for educational and coaching purposes for beginners and developers. Anyone can practice and apply the recipe/tutorial presented here, but the reader is taking full responsibility for his/her actions. The author (content curator) of this recipe (code / program) has made every effort to ensure the accuracy of the information was correct at time of publication. The author (content curator) does not assume and hereby disclaims any liability to any party for any loss, damage, or disruption caused by errors or omissions, whether such errors or omissions result from accident, negligence, or any other cause. The information presented here could also be found in public knowledge domains.
Learn by Coding: v-Tutorials on Applied Machine Learning and Data Science for Beginners
Latest end-to-end Learn by Coding Projects (Jupyter Notebooks) in Python and R:
All Notebooks in One Bundle: Data Science Recipes and Examples in Python & R.
End-to-End Python Machine Learning Recipes & Examples.
End-to-End R Machine Learning Recipes & Examples.
Applied Statistics with R for Beginners and Business Professionals
Data Science and Machine Learning Projects in Python: Tabular Data Analytics
Data Science and Machine Learning Projects in R: Tabular Data Analytics
Python Machine Learning & Data Science Recipes: Learn by Coding
R Machine Learning & Data Science Recipes: Learn by Coding
Comparing Different Machine Learning Algorithms in Python for Classification (FREE)
There are 2000+ End-to-End Python & R Notebooks are available to build Professional Portfolio as a Data Scientist and/or Machine Learning Specialist. All Notebooks are only $29.95. We would like to request you to have a look at the website for FREE the end-to-end notebooks, and then decide whether you would like to purchase or not.